目录
目录
文章目录
  1. 整合说明
  2. 导入相关Jar包
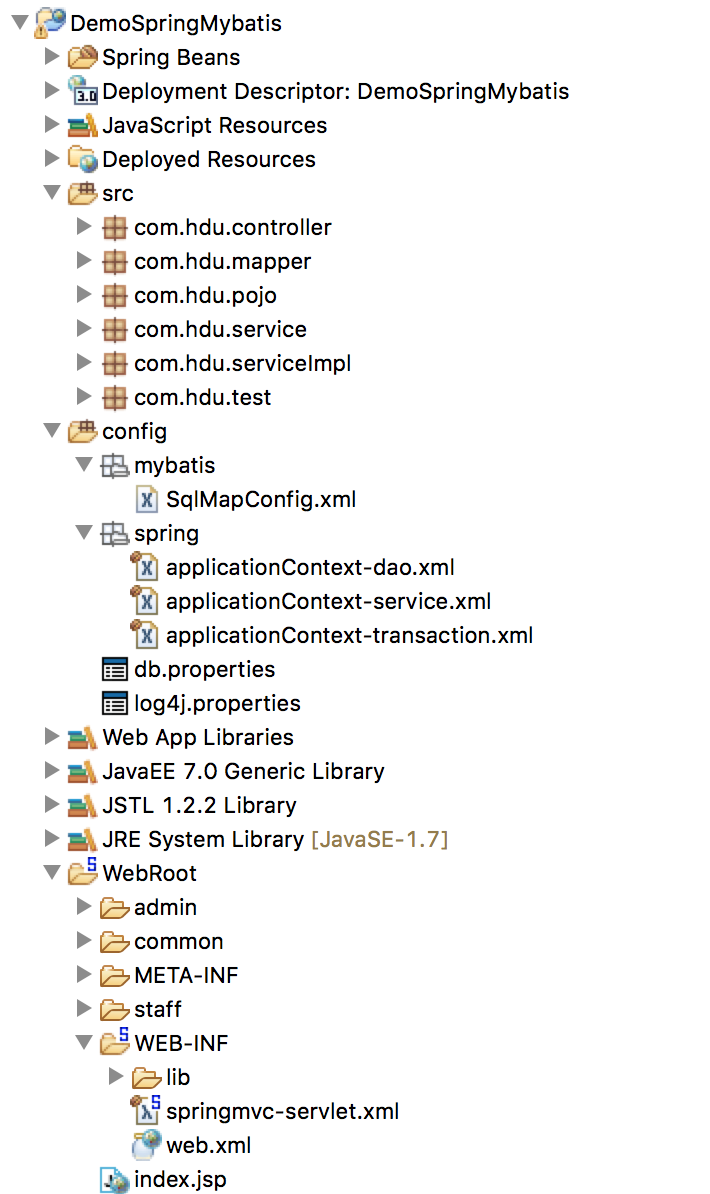
  3. 项目目录结构
  4. 框架整合配置文件详细说明
  5. 总结

SSM框架整合

整合说明

  • springmvc是spring的子框架,不用进行整合
    • 配置文件为 springmvc-servlet.xml
  • spring和mybatis是需要整合的,最主要的!

    • 配置文件,将原本的application.xml拆分为三部分好方便管理。
      • applicationContext-dao.xml
      • aapplicationContext-service.xml
      • applicationContext-transaction.xml
    • 你会发现mybatis的配置文件sqlMapConfig.xml里面的配置基本都转移了。
  • 版本

    • springmvc 4.3.5
    • spring 4.3.5
    • mybatis 3.3.0
  • 相关jar包下载地址

导入相关Jar包

  • 相关jar包,简单说一些
    • springmvc和spring类
      • spring-aop
      • spring-beans
      • spring-core Spring核心
      • spring-webmvc-4.3.5 SpringMCV核心
      • ……
    • mybatis类
      • mybatis-3.3.0 Mybatis核心
      • mybatis-spring-1.3.1 用于整合Spring和Mybatis
    • commons类
      • commom-dbcp2-2.1.1 common数据源第二版本
      • common-pool2-2.4.2
      • common-logging-1.2
      • ……
    • mysql类
      • mysql-connector-java-5.1.7 连接MySQL
    • log4j类
      • log4j-1.2.17 日志输出
      • log4j-api-2.2
      • log4j-core-2.2

项目目录结构

  • controller 为控制器
  • mapper 里面写mapper.xml和mapper.java
  • pojo 为数据模型层
  • service 为业务接口层
  • serviceImpl 为业务实现层
  • test 测试

框架整合配置文件详细说明

  • 整合Web项目和Spring,需要在web.xml中配置。通过监听器,实现框架的整合(在监听器中,实现了Spring框架的初始化设置)

    1
    2
    3
    4
    5
    6
    7
    8
    9
    10
    11
    <content-param>
    <description>设置Spring配置文件的位置</description>
    <param-name>contextConfigLocation</param-name>
    <param-value>classpath:applicationContext.xml</param-value>
    </content-param>
    <!-- 这里classpath:后面你需要填写的Spring配置文件的位置,这里这样写是因为Spring的配置文件直接放在src根目录下 -->
    <listener>
    <description>加载Spring配置文件,并执行初始化操作</description>
    <listener-class>org.springframework.web.context.ContextLoaderListener</listener-class>
    </listener>
  • 整合Web项目和SpringMVC,需要在web.xml中配置。通过一个servlet实现框架的整合。

    1
    2
    3
    4
    5
    6
    7
    8
    9
    10
    11
    12
    <servlet>
    <servlet-name>springmvc</servlet-name>
    <servlet-class>org.springframework.web.servlet.DispatcherServlet</servlet-class>
    <init-param>
    <!-- override default name {servlet-name}-servlet.xml -->
    <param-name>contextConfigLocation</param-name>
    <param-value>classpath:/WEB-INF/springmvc-servlet.xml</param-value>
    </init-param>
    <load-on-startup>1</load-on-startup>
    </servlet>
  • Web项目和Spring、SpringMVC整合完毕了。那么,现在来看看Spring和SpringMVC的整合。

  • 前面说过,SpringMVC是Spring的子框架,那么整合的事情看起来是如此和谐,需要的配置文件就是上面的<param-value>classpath:/WEB-INF/springmvc-servlet.xml</param-value>中所包含的springmvc-servlet.xml。

    1
    2
    3
    4
    5
    6
    7
    8
    9
    10
    11
    12
    <!--
    配置自动扫描,之前需要将各种bean利用id和ref属性手动来关联起来,这是十分繁杂的。
    现在,我们只需要利用Spring提供的自动扫描,即可轻松解决。
    base-package是指明需要扫描的包,Spring将扫描该文件夹,并找出Bean(注解为@Component)
    并注册到Spring容器中。
    在Spring中,有4中种类型的组件自动扫描注解类型
    1.@Component:自动扫描组件
    2.@Repository:持久层DAO组件
    3.@Service:业务层组件
    4.@Controller:表示层控制器组件
    -->
    <context:component-scan base-package="" />
  • web.xml

1
2
3
4
5
6
7
8
9
10
11
12
13
14
15
16
17
18
19
20
21
22
23
24
25
26
27
28
29
30
31
32
33
34
35
36
37
38
39
40
41
42
43
44
45
46
47
48
49
50
51
52
53
54
55
56
57
58
59
60
61
62
63
64
<?xml version="1.0" encoding="UTF-8"?>
<web-app xmlns:xsi="http://www.w3.org/2001/XMLSchema-instance" xmlns="http://xmlns.jcp.org/xml/ns/javaee" xsi:schemaLocation="http://xmlns.jcp.org/xml/ns/javaee http://xmlns.jcp.org/xml/ns/javaee/web-app_3_1.xsd" id="WebApp_ID" version="3.1">
<display-name>SpringMCVSpringMybatis</display-name>
<!-- 整合Web项目和Spring -->
<context-param>
<param-name>contextConfigLocation</param-name>
<param-value>classpath:/WEB-INF/classes/spring/applicationContext-*.xml</param-value>
</context-param>
<listener>
<listener-class>org.springframework.web.context.ContextLoaderListener</listener-class>
</listener>
<!-- 防止Spring内存溢出 -->
<listener>
<listener-class>org.springframework.web.util.IntrospectorCleanupListener</listener-class>
</listener>
<!-- spring框架提供的字符集过滤器 -->
<!-- spring Web MVC框架提供了org.springframework.web.filter.CharacterEncodingFilter用于解决POST方式造成的中文乱码问题 -->
<filter>
<filter-name>characterEncodingFilter</filter-name>
<filter-class>org.springframework.web.filter.CharacterEncodingFilter</filter-class>
<init-param>
<param-name>encoding</param-name>
<param-value>UTF-8</param-value>
</init-param>
<init-param>
<param-name>forceEncoding</param-name>
<param-value>true</param-value>
</init-param>
</filter>
<filter-mapping>
<filter-name>characterEncodingFilter</filter-name>
<url-pattern>/*</url-pattern>
</filter-mapping>
<!-- 配置springmvc的前端控制器 DispatchcerServlet -->
<servlet>
<servlet-name>springmvc</servlet-name>
<servlet-class>org.springframework.web.servlet.DispatcherServlet</servlet-class>
<init-param>
<param-name>contextConfigLocation</param-name>
<param-value>classpath:springmvc.xml</param-value>
</init-param>
<load-on-startup>1</load-on-startup>
</servlet>
<!--
默认情况下:DispatcherServlet会寻找WEB-INF下,命名规范为springmvc-servlet.xml文件。
如果需要修改springmvc配置文件的名称和位置,需要在web.xml中的<servlet />标记中增加
<init-param></init-param>:
-->
<servlet-mapping>
<servlet-name>springmvc</servlet-name>
<url-pattern>*.do</url-pattern>
</servlet-mapping>
<welcome-file-list>
<welcome-file>index.jsp</welcome-file>
</welcome-file-list>
</web-app>
  • springmvc-servlet.xml
1
2
3
4
5
6
7
8
9
10
11
12
13
14
15
16
17
18
19
20
21
22
23
24
25
26
27
28
29
30
31
32
33
34
35
36
37
38
39
40
41
42
43
44
<beans xmlns="http://www.springframework.org/schema/beans"
xmlns:xsi="http://www.w3.org/2001/XMLSchema-instance"
xmlns:context="http://www.springframework.org/schema/context"
xmlns:mvc="http://www.springframework.org/schema/mvc"
xsi:schemaLocation="http://www.springframework.org/schema/beans http://www.springframework.org/schema/beans/spring-beans-4.3.xsd
http://www.springframework.org/schema/context http://www.springframework.org/schema/context/spring-context-4.3.xsd
http://www.springframework.org/schema/mvc http://www.springframework.org/schema/mvc/spring-mvc-4.3.xsd">
<!-- 配置注解驱动 -->
<mvc:annotation-driven/>
<!-- 配置扫描器 -->
<context:component-scan base-package="com/" />
<!-- 配置视图解析器 -->
<bean id="viewResolver" class="org.springframework.web.servlet.view.InternalResourceViewResolver">
<property name="viewClass" value="org.springframework.web.servlet.view.JstlView" />
<property name="prefix" value="/view/" />
<property name="suffix" value=".jsp" />
</bean>
<!-- 从请求和响应读取/编写字符串 -->
<bean id="stringHttpMessage" class="org.springframework.http.converter.StringHttpMessageConverter">
<property name="supportedMediaTypes">
<list>
<value>text/plain;charset=UTF-8</value>
</list>
</property>
</bean>
<!-- 用于将对象转化为JSON -->
<bean id="jsonConverter" class="org.springframework.http.converter.json.MappingJackson2HttpMessageConverter"></bean>
<bean class="org.springframework.web.servlet.mvc.annotation.AnnotationMethodHandlerAdapter">
<property name="messageConverters">
<list>
<ref bean="stringHttpMessage"/>
<ref bean="jsonConverter"/>
</list>
</property>
</bean>
<!-- 静态资源处理 -->
<mvc:resources location="/common/" mapping="/common/**"></mvc:resources>
</beans>
  • applicationContext-dao.xml
1
2
3
4
5
6
7
8
9
10
11
12
13
14
15
16
17
18
19
20
21
22
23
24
25
26
27
28
29
30
31
32
33
34
35
36
37
38
39
40
41
42
43
44
45
46
<?xml version="1.0" encoding="UTF-8"?>
<beans xmlns="http://www.springframework.org/schema/beans"
xmlns:xsi="http://www.w3.org/2001/XMLSchema-instance" xmlns:mvc="http://www.springframework.org/schema/mvc"
xmlns:context="http://www.springframework.org/schema/context"
xmlns:aop="http://www.springframework.org/schema/aop" xmlns:tx="http://www.springframework.org/schema/tx"
xsi:schemaLocation="http://www.springframework.org/schema/beans
http://www.springframework.org/schema/beans/spring-beans-4.3.xsd
http://www.springframework.org/schema/mvc
http://www.springframework.org/schema/mvc/spring-mvc-4.3.xsd
http://www.springframework.org/schema/context
http://www.springframework.org/schema/context/spring-context-4.3.xsd
http://www.springframework.org/schema/aop
http://www.springframework.org/schema/aop/spring-aop-4.3.xsd
http://www.springframework.org/schema/tx
http://www.springframework.org/schema/tx/spring-tx-4.3.xsd ">
<!-- 加载db.properties文件中的内容,db.properties文件中key命名要有一定的特殊规则 -->
<context:property-placeholder location="classpath:db.properties"/>
<!-- 配置数据源,dbcp连接池 -->
<bean id="iLoveMysql" class="org.apache.commons.dbcp2.BasicDataSource" destroy-method="close">
<property name="driverClassName" value="${jdbc.driver}" />
<property name="url" value="${jdbc.url}" />
<property name="username" value="${jdbc.username}" />
<property name="password" value="${jdbc.password}" />
<property name="maxIdle" value="5" />
</bean>
<!-- sqlsessionfactory配置,集成mybatis -->
<bean id="sqlSessionFactory" class="org.mybatis.spring.SqlSessionFactoryBean">
<!-- 数据库连接池 -->
<property name="dataSource" ref="iLoveMysql" />
<!-- 加载mybatis的全局配置文件 -->
<property name="configLocation" value="classpath:mybatis/SqlMapConfig.xml" />
<property name="typeAliasesPackage" value="com.hdu.pojo" />
</bean>
<!-- mapper扫描器 -->
<bean class="org.mybatis.spring.mapper.MapperScannerConfigurer">
<!-- 扫描包路径,如果需要扫描多个包,中间使用半角逗号隔开 -->
<property name="basePackage" value="com.hdu.mapper" />
<property name="sqlSessionFactoryBeanName" value="sqlSessionFactory" />
</bean>
</beans>
  • applicationContext-service.xml
1
2
3
4
5
6
7
8
9
10
11
12
13
14
15
16
17
18
19
<?xml version="1.0" encoding="UTF-8"?>
<beans xmlns="http://www.springframework.org/schema/beans"
xmlns:xsi="http://www.w3.org/2001/XMLSchema-instance" xmlns:mvc="http://www.springframework.org/schema/mvc"
xmlns:context="http://www.springframework.org/schema/context"
xmlns:aop="http://www.springframework.org/schema/aop" xmlns:tx="http://www.springframework.org/schema/tx"
xsi:schemaLocation="http://www.springframework.org/schema/beans
http://www.springframework.org/schema/beans/spring-beans-4.3.xsd
http://www.springframework.org/schema/mvc
http://www.springframework.org/schema/mvc/spring-mvc-4.3.xsd
http://www.springframework.org/schema/context
http://www.springframework.org/schema/context/spring-context-4.3.xsd
http://www.springframework.org/schema/aop
http://www.springframework.org/schema/aop/spring-aop-4.3.xsd
http://www.springframework.org/schema/tx
http://www.springframework.org/schema/tx/spring-tx-4.3.xsd ">
<!-- 自动扫描业务包 -->
<context:component-scan base-package="com.hdu.serviceImpl" />
</beans>
  • applicationContext-transaction.xml
1
2
3
4
5
6
7
8
9
10
11
12
13
14
15
16
17
18
<?xml version="1.0" encoding="UTF-8"?>
<beans xmlns="http://www.springframework.org/schema/beans"
xmlns:xsi="http://www.w3.org/2001/XMLSchema-instance" xmlns:mvc="http://www.springframework.org/schema/mvc"
xmlns:context="http://www.springframework.org/schema/context"
xmlns:aop="http://www.springframework.org/schema/aop" xmlns:tx="http://www.springframework.org/schema/tx"
xsi:schemaLocation="http://www.springframework.org/schema/beans
http://www.springframework.org/schema/beans/spring-beans-4.3.xsd
http://www.springframework.org/schema/mvc
http://www.springframework.org/schema/mvc/spring-mvc-4.3.xsd
http://www.springframework.org/schema/context
http://www.springframework.org/schema/context/spring-context-4.3.xsd
http://www.springframework.org/schema/aop
http://www.springframework.org/schema/aop/spring-aop-4.3.xsd
http://www.springframework.org/schema/tx
http://www.springframework.org/schema/tx/spring-tx-4.3.xsd ">
<!-- 事务未配置,不影响框架整合 -->
</beans>
  • db.properties(数据库连接配置)
1
2
3
4
jdbc.driver=com.mysql.jdbc.Driver
jdbc.url=jdbc\:mysql\://localhost\:3306/filesystem
jdbc.username=root
jdbc.password=root
  • log4j.properties(日志配置)
1
2
3
4
5
log4j.rootCategory=INFO, stdout
log4j.appender.stdout=org.apache.log4j.ConsoleAppender
log4j.appender.stdout.layout=org.apache.log4j.PatternLayout
log4j.appender.stdout.layout.ConversionPattern=%d{ABSOLUTE} %5p %t %c{2}:%L - %m%n
log4j.category.org.springframework.beans.factory=DEBUG

总结

  • SSM框架目前是比较流行的,有轻量,简洁,快速等特点。
  • 在接口的实现类上,一般要用加上@Service注解,这样才能使用@Autowired来注入接口。